Mailer Box Template
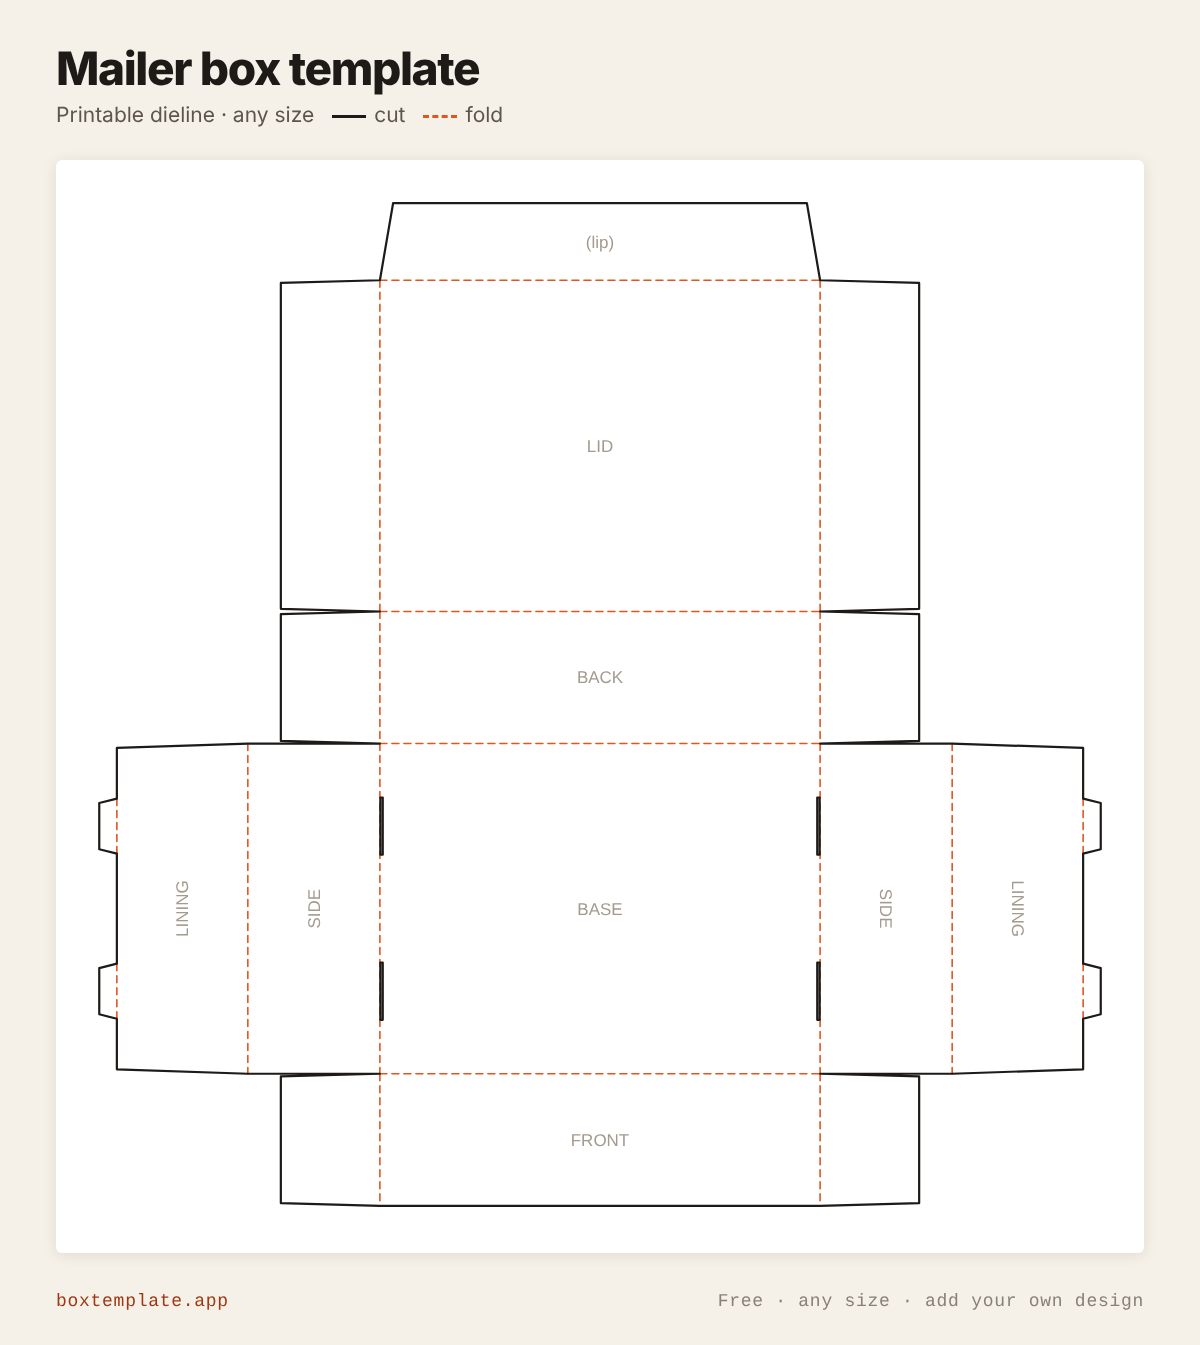
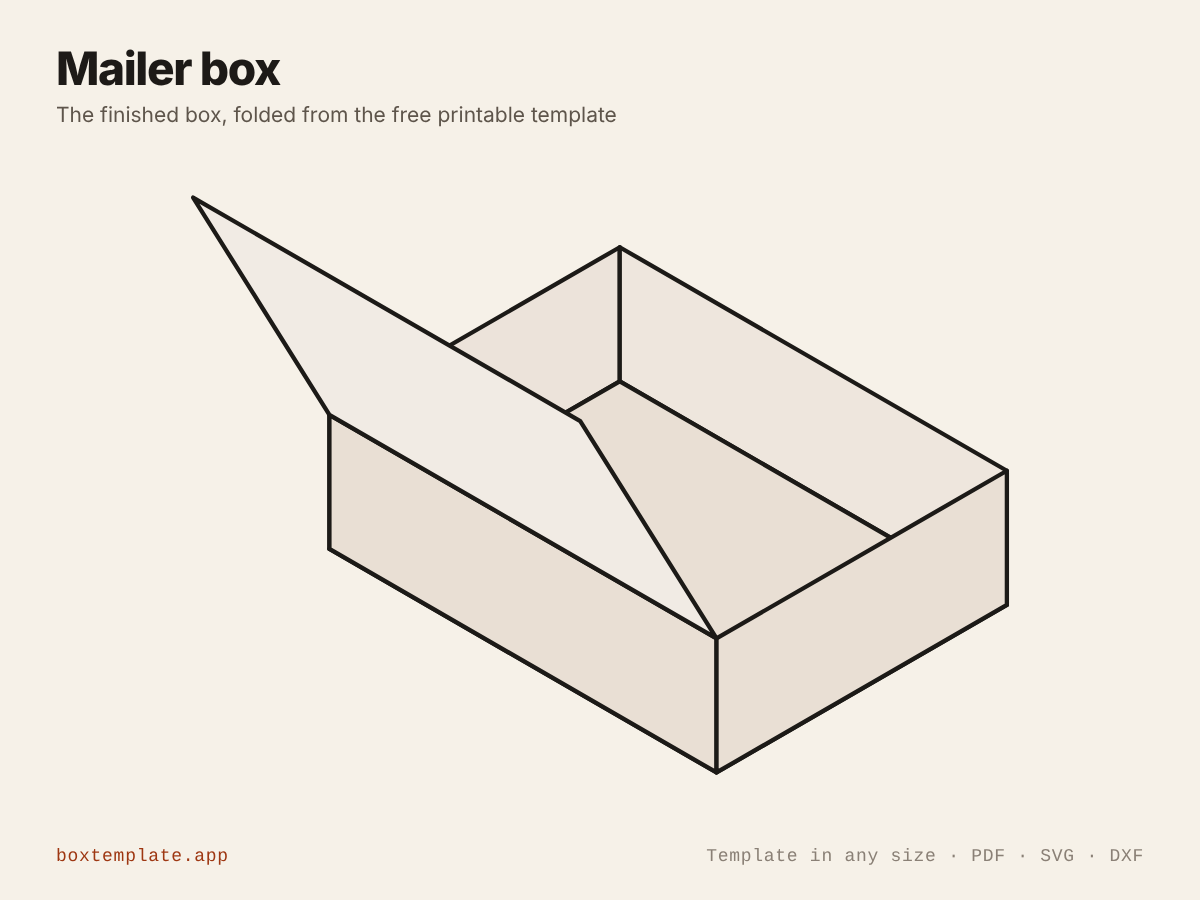
The one-piece postal box every online shop uses: double side walls that fold over the ears and lock into the base, and a lid whose lip tucks into the front. No glue anywhere.
Mailer box — change shape
Put a logo, photo or pattern straight onto the box — most free template sites give you the outline and stop there. Drag it where you want it; it is trimmed to the cut lines so nothing prints off the card, and it stays in your browser.
Advanced settingsunits, flaps, board, paper, lines
Bigger than the paper? Each piece prints whole on its own sheet. A single piece is never split: pick bigger paper or a smaller size. More about printing
This shape has no 3D view yet. The template is still exact.
This shape's 3D view is only an approximation of the printed sheet, so it shows plain card. Your pictures still print exactly where you placed them on the template.
Drag to turn and tilt it; ctrl + scroll or the + and − buttons zoom.Swipe sideways to turn it. Two fingers tilt and pinch to zoom; full screen lets one finger do everything. Double-tap to reset. The fold starts from the very template you print, so gaps and loose tabs show.
Drop a picture anywhere on the drawingTap “Add a picture” below to print your own design on this box.
Print at 100% (“actual size”), never “fit to page”, or the box comes out the wrong size.
The mailer box template, flat and folded
What this template is for
The one-piece postal box every online shop uses: double side walls that fold over the ears and lock into the base, and a lid whose lip tucks into the front. No glue anywhere.
Also called shipping box · postal box · ecommerce mailer · roll end tuck box · bakery box
What size mailer box do I need?
The same mailer box does a different job at each size. These are starting sizes for the things people make it for most. Tap one to open the template at that size, then measure your own and change any number to fit.
| Use | Size (length × width × depth) | Holds |
|---|---|---|
| Jewellery, candles, cosmetics | 6 × 4 × 2 in (152 × 102 × 51 mm) | A small gift, candle or a few cosmetics |
| Book | 240 × 170 × 40 mm | A paperback or A5 notebook with wrapping |
| T-shirt | 10 × 8 × 2 in (254 × 203 × 51 mm) | One folded T-shirt |
| Hoodie or sweater | 14 × 10 × 3 in (356 × 254 × 76 mm) | One folded hoodie, sweater or kurta |
The mailer box at a glance
| Standard size | Inside length × Inside width × Inside depth: 200 × 150 × 60 mm (7.9 × 5.9 × 2.4 in) |
|---|---|
| Flat sheet at that size | 457 × 456 mm (18 × 17.9 in) |
| Prints on | A4: too big at this size · US Letter: too big at this size · A3: too big at this size |
| Biggest on one sheet of A4 | 83 × 62 × 25 mm (3.3 × 2.4 × 1 in) |
| Biggest on one sheet of US Letter | 86 × 64 × 25 mm (3.4 × 2.5 × 1 in) |
| Glue | Yes |
| Drawn for | Heavy cardstock, 350–450 gsm / cereal-box card (0.5 mm) |
Printing it
At its standard size the mailer box is bigger than A3: pick a larger sheet in the box maker, or make it smaller. Whatever the size, print at 100% (“actual size”), never “fit to page”. Printing it right · Cricut and Silhouette · Designing it in Canva · Your own picture on it
How to put it together
Drawn from the mailer box template itself; words in capitals are printed on it.
-
Cut the solid lines
Solid lines are cuts: inside shapes first.
-
Score every dashed line
Dashed lines are folds: score them first so the card does not crack.
-
Step by step
- Cut the outline and the four small slots in the BASE. If you set a window border, cut the opening in the LID and tape acetate behind it.
- Fold the FRONT and BACK walls up and fold their ears in.
- Fold each SIDE wall up over the ears, then fold its LINING down inside, over the ears.
- Push the two lock tabs on each lining into the slots in the BASE.
- Load the box, bring the LID over and push the (lip) down inside the FRONT wall.
Glue: glue stick on paper, PVA on card.
Tip for this one: Cut the four small slots in the base. Fold the front and back walls up and their ears in. Fold each side wall up over the ears, then fold its lining down inside, over the ears, and push the two lock tabs into the slots in the base. Load it, bring the lid over and push the lip down inside the front wall. If you set a window border, cut the opening out before you fold anything, and tape a piece of acetate or cellophane over it on the inside — the frame is thin, and it tears far more easily once the box has been creased.
Questions about the mailer box
Why is a mailer box better than a plain carton for posting?
It is one piece, so nothing can come apart in transit, and it needs no glue or tape to hold its shape — the lip locks into the front wall. It also opens flat, which is why it is the standard for unboxing.
What board should I use?
For real posting, single-wall corrugated at about 3 mm. Set the thickness field to match: the lid is drawn one thickness deeper than the space it covers, because it has to reach over the top of the back wall and down the front.
What are the ears for?
The small flaps on the front, back and lid panels. They fold inwards and are trapped behind the side walls, which is what stops the box splaying open under load.
What size mailer box do I need for jewellery, candles, cosmetics, book or t-shirt?
Jewellery, candles, cosmetics: 6 × 4 × 2 in (152 × 102 × 51 mm); Book: 240 × 170 × 40 mm; T-shirt: 10 × 8 × 2 in (254 × 203 × 51 mm); Hoodie or sweater: 14 × 10 × 3 in (356 × 254 × 76 mm). These are starting sizes; measure what goes inside and add a few millimetres of room.
Templates like this one
Guides: How to make a mailer box for shipping · How to make a box from a cereal box (and other card you already have) · Boxes without glue · How to measure a product for a custom box
See all 174 templates · For Canva · For Cricut · For Etsy sellers · Getting it printed
Collections: Wedding and party favour box templates · Christmas box templates · Food box templates · Diwali mithai box templates