Exploding Box Template
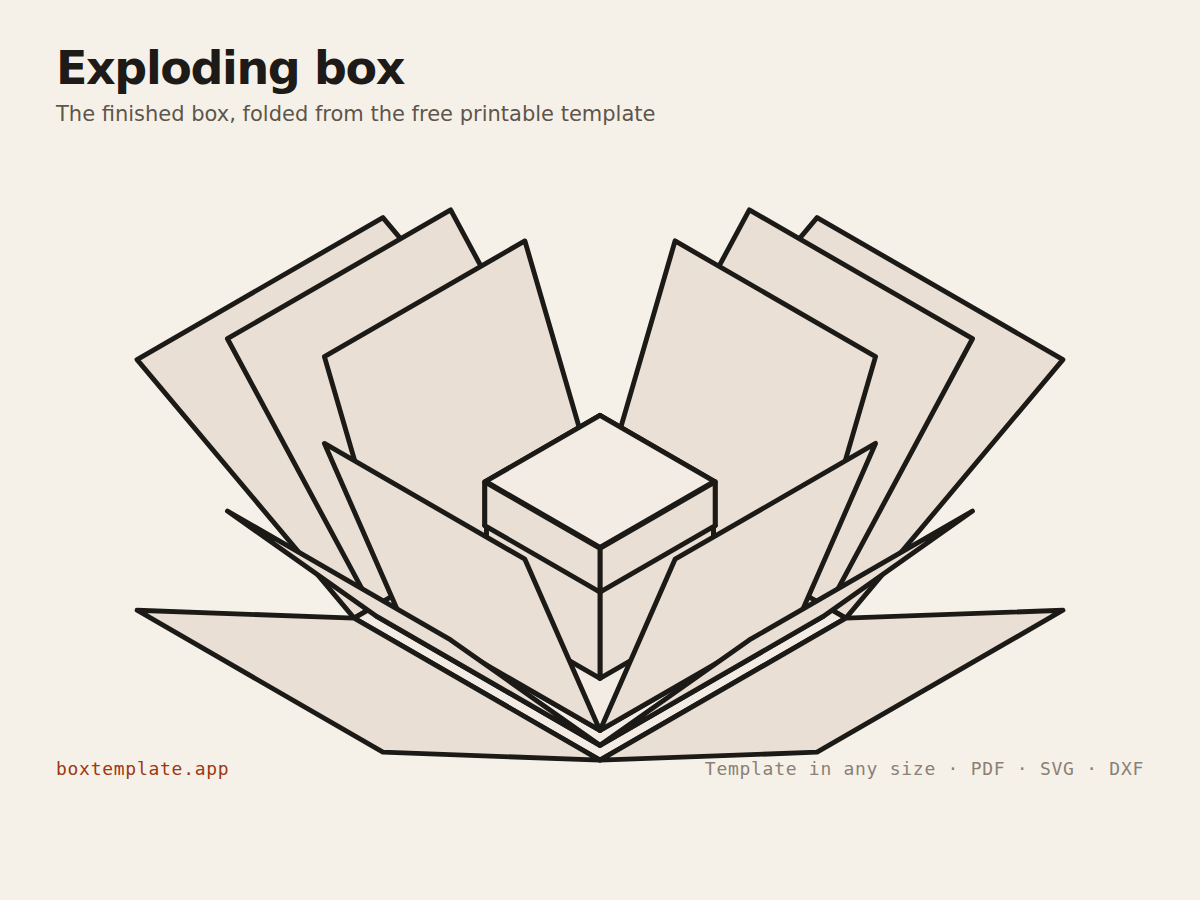
The photo explosion box: nested layers that fall open flat when the lid is lifted, showing every wall and a small gift box in the middle. Anniversaries, birthdays, proposals and memory gifts.
Exploding box — change shape
Put a logo, photo or pattern straight onto the box — most free template sites give you the outline and stop there. Drag it where you want it; it is trimmed to the cut lines so nothing prints off the card, and it stays in your browser.
Advanced settingsunits, flaps, board, paper, lines
Bigger than the paper? Each piece prints whole on its own sheet. A single piece is never split: pick bigger paper or a smaller size. More about printing
This shape has no 3D view yet. The template is still exact.
This shape's 3D view is only an approximation of the printed sheet, so it shows plain card. Your pictures still print exactly where you placed them on the template.
Drag to turn and tilt it; ctrl + scroll or the + and − buttons zoom.Swipe sideways to turn it. Two fingers tilt and pinch to zoom; full screen lets one finger do everything. Double-tap to reset. The fold starts from the very template you print, so gaps and loose tabs show.
Drop a picture anywhere on the drawingTap “Add a picture” below to print your own design on this box.
Print at 100% (“actual size”), never “fit to page”, or the box comes out the wrong size.
The exploding box template, flat and folded
What this template is for
The photo explosion box: nested layers that fall open flat when the lid is lifted, showing every wall and a small gift box in the middle. Anniversaries, birthdays, proposals and memory gifts.
Also called explosion box · nested memory box · photo explosion box
What size exploding box do I need?
The same exploding box does a different job at each size. These are starting sizes for the things people make it for most. Tap one to open the template at that size, then measure your own and change any number to fit.
| Use | Size (Outer box, square × Wall height) | Holds |
|---|---|---|
| Small surprise | 65 × 65 mm | Small photos and a ring or note in the middle |
| Photo box | 100 × 100 mm | Square 3 × 3 in (Instax Square size) photos on the walls |
| Large memory box | 150 × 150 mm | Bigger photos and a gift in the middle |
The exploding box at a glance
| Standard size | Outer box, square × Wall height: 65 × 65 mm (2.6 × 2.6 in) |
|---|---|
| Number of layers | 3 |
| Flat sheet at that size | 448 × 366 mm (17.6 × 14.4 in) |
| Prints on | A4: 3 sheets, each piece whole · US Letter: 4 sheets, each piece whole · A3: 2 sheets, each piece whole |
| Biggest on one sheet of A4 | 33 × 33 mm (1.3 × 1.3 in) |
| Biggest on one sheet of US Letter | 33 × 33 mm (1.3 × 1.3 in) |
| Glue | Yes |
| Drawn for | Heavy cardstock, 350–450 gsm / cereal-box card (0.5 mm) |
Making an exploding box that really opens
Plan the panels first
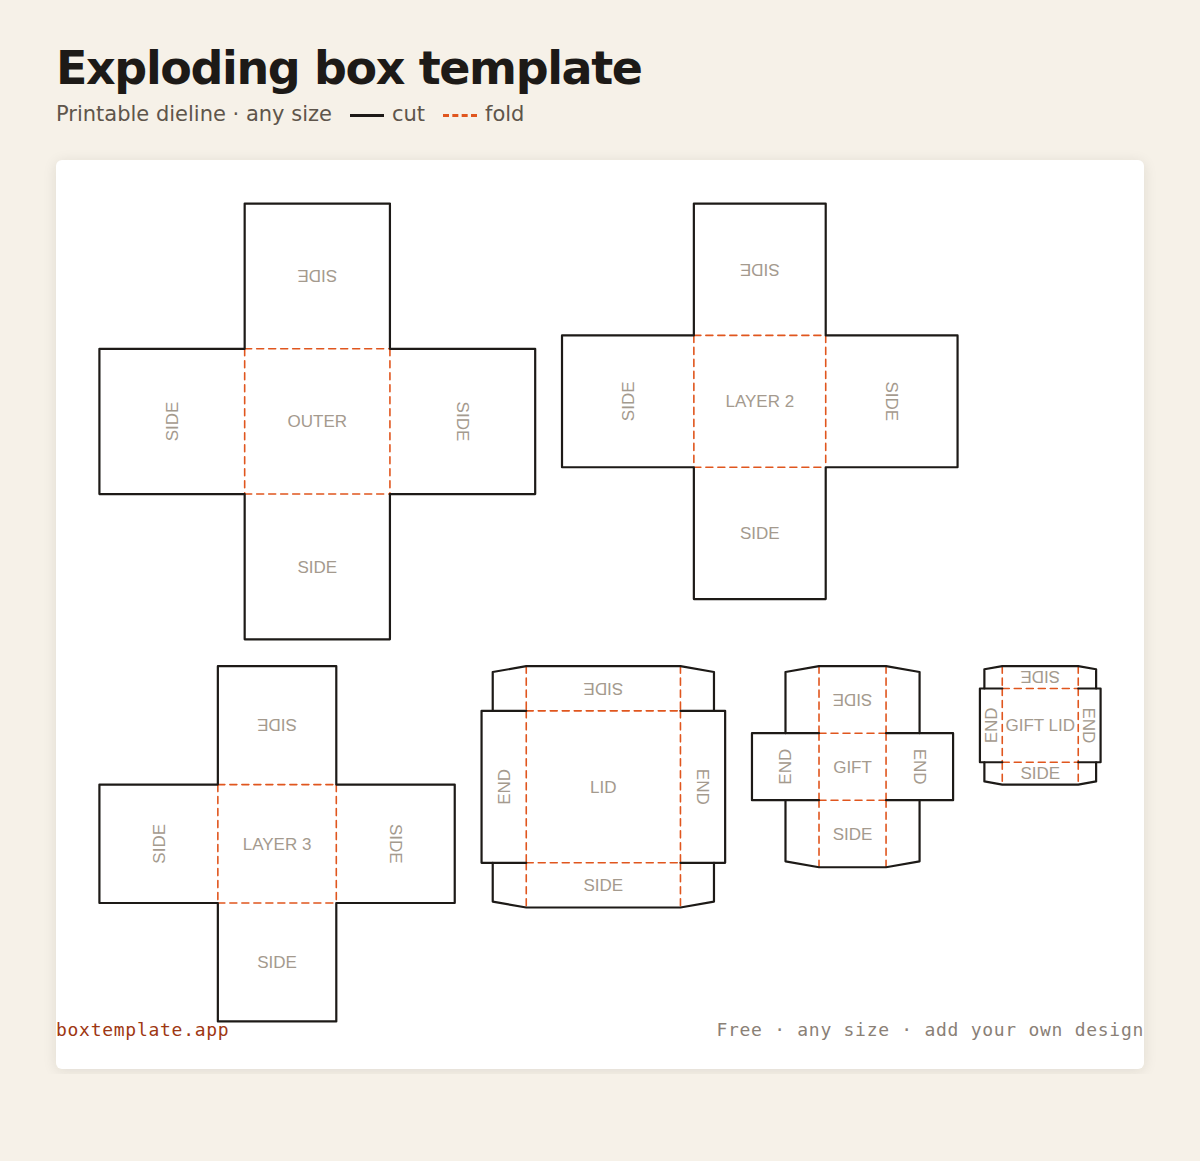
Three layers have twelve walls and three floors, plus the lid and the gift box in the middle. Count your photos and messages before you print: a typical memory box uses the four outer walls for photos, the middle layer for messages or dates, and the inner layer for pockets, tags or a small booklet.
Sizes that work
- Classic photo box: 100 mm square, three layers. Holds photos cut to about 90 mm, or square instant prints.
- Small card box: 65 mm, as it opens with the tool, three layers, for messages and tiny photos.
- Big memory box: 150 mm and four layers. Use 300 gsm card so the tall walls stand.
Which card
Use 250–300 gsm card. The walls have to stand up against each other when the lid is on and fall open when it is lifted; thin paper flops, and very thick board makes the nested walls jam. The gap between layers must be more than the card is thick, so the tool will not set it below the thickness plus 1 mm.
Decorate before you fold
Glue photos and decorations on every panel while the card is flat, and keep them a few millimetres from every crease, or the walls will not fold flat. Thick embellishments belong on the outer layer, where nothing presses against them.
Mistakes to avoid
- Gluing walls together. Layers are glued by their floors only, centred; glue on a wall and the box will not open.
- A lid that is too tight. Raise the lid clearance so it lifts off without dragging the outer walls up with it.
- Skipping a test fold. Fold the empty layers once before decorating to check they nest and open.
Printing it
At its standard size the exploding box prints on 3 sheets of A4 or 4 sheets of US Letter, each piece whole on its sheet, so there is nothing to tape. Whatever the size, print at 100% (“actual size”), never “fit to page”. Printing it right · Cricut and Silhouette · Designing it in Canva · Your own picture on it
How to put it together
Drawn from the exploding box template itself; words in capitals are printed on it.
-
Cut the solid lines
Solid lines are cuts: inside shapes first.
-
Score every dashed line
Dashed lines are folds: score them first so the card does not crack.
-
Step by step
- Cut out every piece: OUTER, each LAYER, the LID and, if you set one, the GIFT box and GIFT LID.
- Decorate every panel now, while the pieces are flat.
- Fold all the walls of each layer up and back down, so they open easily.
- Glue each layer onto the one below by its middle square only, centred, smallest on top. Never glue the walls.
- Build the GIFT box and GIFT LID like small trays and glue the box onto the middle of the top layer.
- Fold all the walls up and put the LID on: the lid is what holds it shut. Lift it and the walls fall open.
Glue: glue stick on paper, PVA on card.
Tip for this one: Decorate every panel before you fold anything. Glue each layer to the one below by its middle square only, centred, smallest on top — never glue the walls, or the box cannot open. Fold all the walls up, glue the centre box in the middle, and put the lid on: the lid is what holds it shut.
Questions about the exploding box
What actually makes it explode?
The lid. Every layer is a cross whose four walls fold up, and nothing is glued along the walls. Each layer is only a few millimetres smaller than the one outside it, so its walls lean on the walls outside them, and the lid holds the outer walls in. Lift the lid and the walls fall open one layer after another.
How much smaller is each layer?
Twice the gap, in the floor and the wall height alike. With the 3 mm gap it opens with, a 65 mm box has layers of 65, 59 and 53 mm, much like the classic quarter-inch steps of 4, 3¾ and 3½ inches. The gap has to be more than the card is thick, because each wall stands outside its own floor; the tool will not let it be less than the thickness plus 1 mm.
How do I put it together?
Decorate every panel first, while the card is flat. Then glue the layers to each other by their middle squares only, centred, the largest at the bottom. Do not glue any walls to each other, or only one layer will open. Glue the small gift box in the middle, fold every wall up and drop the lid on.
What is the box in the middle for?
The surprise. It is a small box with its own lift-off lid, glued into the centre of the innermost layer, for a ring, a note or a photo. Set its size to 0 if you do not want one. It is kept small enough for the inner walls to close round it, and no taller than they are, so the big lid still goes on.
Will it print on A4?
Yes, piece by piece. At the size it opens with, the largest layer is 195 mm across, so every piece prints whole on A4 or US Letter and the PDF puts them over a few sheets. For the classic 4-inch box on 12 × 12 inch cardstock, set the outer box and the wall height to about 100 mm.
What size exploding box do I need for small surprise, photo box or large memory box?
Small surprise: 65 × 65 mm; Photo box: 100 × 100 mm; Large memory box: 150 × 150 mm. These are starting sizes; measure what goes inside and add a few millimetres of room.
Templates like this one
See all 174 templates · For Canva · For Cricut · For Etsy sellers · Getting it printed
Collections: Wedding and party favour box templates · Christmas box templates · Food box templates · Diwali mithai box templates